
Installing eFORMz on iSeries/AS400
Prerequisites
- Windows 7 or higher connected to a network.
- Authority to install programs.
- Java 1.8 or higher. 64-bit is strongly recommended.
- An eFORMz-dedicated ID on AS/400 to use for installing and running eFORMz.
Installing eFORMz
- Download and install eFORMz to your Windows system as shown at https://minisoft.com/support/index.php/installing-eformz-on-a-local-workstation-video-only/.
- Start the eFORMz Composer.
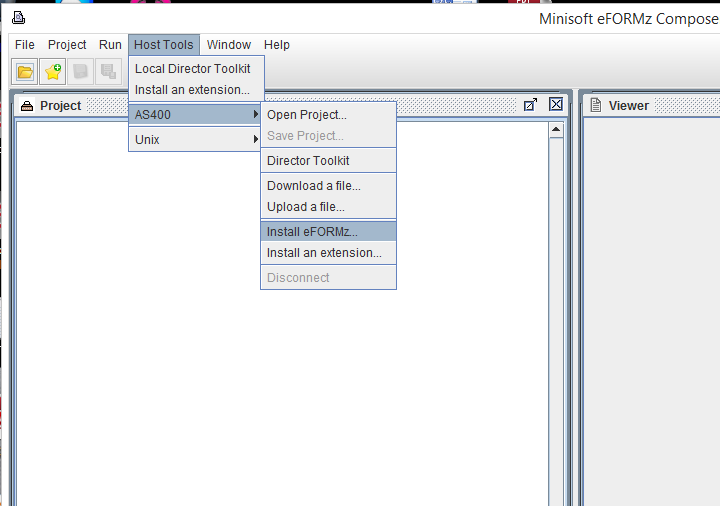
- Click Host Tools > AS400 > Install eFORMz…
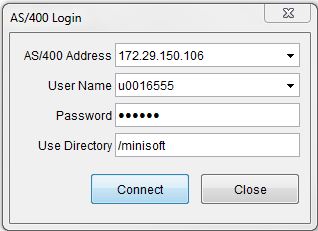
4. Enter your system address and user credentials in the AS/400 Login window. The user ID should be a dedicated ID to run eFORMz. The “Use Directory” field is the installation path. /minisoft is the default, but the user can install to /app/minisoft or some other existing structure.
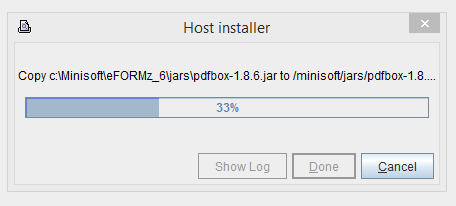
5. The eFORMz installation begins and files are uploaded to the host. The complete list of files is in Default Files and Folders Installed to IBM iSeries.
Optional Custom eFORMz Job Queue
The AS400 is normally delivered with a maximum batch job limit of one, meaning that only one job can execute at a time. Since the eFORMz Print Monitor runs as a job
(efzPM), if executed and left running no other jobs will run. Instead they will remain in a ‘jobq’ state until the eFORMz PM is terminated. One option is to increase the maximum job setting value for QBATCH to a value greater than one. If, however, your jobs require single-thread processing then this may not be the solution for you.
Another method, which we recommend, is to create a separate job queue to run the eFORMz Director. To do so:
1. Create an eFORMz Library. At the command line enter the following:
CRTLIB (To modify: WRKLIB EFZLIB)
Specify the following options:
Name: EFZLIB
Type: *PROD
Text: eFORMz Library
2. Create an eFORMz Job Queue. At the command line enter the following:
CRTJOBQ (To modify: WRKJOBQ)
Specify the following options:
Job Name: EFZJOBQ
Library: EFZLIB
Text: eFORMz Job Queue
3. Create an eFORMz Job Description. At the command line enter the following:
CRTJOBD (To modify: WRKJOBD)
Specify the following options:
Job desc.: EFZJOBD
Library: EFZLIB
Job queue: EFZJOBQ
Library: EFZLIB
4. To determine the next available sequence number enter the following at the command line:
DSPSBSD *QBASE
Select option #6 (Job Queue Entries) and check for an unused sequence number.
5. Attach a job queue to an active subsystem. At the command line enter the following:
ADDJOBQE (To modify: CHGJOBQE)
Specify the following options:
Subsystem: *QBASE
Library: *LIBL
Jobqueue: EFZJOBQ
Library: EFZLIB
Max active jobs: 1 (or number of batch jobs permitted to execute)
Seq. number: ______ (enter value from the previous step)
6. Create a new eFORMz User. At the command line enter the following:
WRKUSRPRF EFORMZ
Specify the following options:
Option: 1
User: EFORMZ
Description: eFORMz User
Password: { password }
Type of User: *SYSOPR {System Operator}
Note: We recommend the minimal security level to be *System Operator.
7. Modify eFORMz Login Profile.
Login as new user (EFORMZ) and make the following changes:
Option: 1 ( user task )
Option: 9 ( change your user profile )
Option: F10 ( additional parameters )
Job description: EFZJOBD
Library: EFZLIB
Configuring the Director
The steps for this are in Director Setup for AS400 and include the following sections:
After you finish setting up the Director, you might want to update your system’s startup program to start the eFORMz Director to maximize up time. If you do not do this, you must manually start the Director after IPL.
Starting the Director
The Director watches for files to process.
Additional Resources:
eFORMz iSeries Deployment Options
iSeries/AS/400 Roadmap
Setting Up eFORMz on the iSeries
License eFORMz on an AS/400 (iSeries) system
Director Setup for AS400/iSeries
Add eFORMz Director to the iSeries/AS/400 startup program
iSeries (AS/400) Automation and Director Commands
iSeries: User Running the Director Must Have a Password
Adding a Remote iSeries Queue to a toolkit configuration file
Troubleshooting: Missing or Lost Data on iSeries